With there are some changes that have been updated and most of this time has been updated too with the support arm translator, which means we can run almost all android apps in google play store, different with android previous ones is android x86 jellybean 4.2 that not support.
Before we try to install directly to the hard drive perhaps we could try to install android x86 in virtualbox so that we will know what the pros and cons of this android jellybean 4.3 x86. And if it is as expected and works well as the android phones are used. That way we can evaluate for themselves of the advantages and disadvantages of android x86 that we will install, because maybe there will be people who want to dual boot between android and windows that are installed together on PC/Laptop.
And here are some things that have been updated and corrected from the Android x86 source:
- Support ARM translator
- Support bluetooth
- Upgrade 3.10.2 kernel so that it becomes more driver support
- Upgrade Mesa OpenGL ES library to 9.2 devel for support amd radeon acceleration and intel chipset.
- Also Not able to suspend and resume
- No support superuser.
There are several ways to install android version of this computer or android x86 jellybean 4.3, and I give it two ways.
1. How to install x86 android 4.3 jelly bean on a PC, or laptop computer can see linked below
dual boot android and windows.The first way above could be see on steps in the link above and the grub setting install grub2win for android-x86 you can see the method in link dual boot android and windows above and add android x86 jellybean 4.3 grub manually below:
# android #
menuentry "Android-4.3-test"{
set root='(hd0,X)'
linux /android-4.3-test/kernel quiet root=/dev/ram0 androidboot.hardware=android_x86 video=-16 SRC=/android-4.3-test
initrd /android-4.3-test/initrd.img
}
### End Android ###
note: change the red text with partition installed on android from your computer example if android on partition or drive D: then replace with (hd0,2) sometimes Drive D: = (hd0,3).
2. The second way to install android-x86 is in a virtual box
Also this steps can be use on Linux ubuntu virtualbox.- Download virtualbox windows version if it will install a virtual box in windows here because there are several other options such as Linux and MAC OS X.
- Download jellybean X86 Android 4.3 iso android-x86-4.3-20130725.iso code@google or Android X86 .org
- After downloading the next step is to install virtual box on computer and start preparations to install android in virtual box.
- Virtualbox installation on ubuntu linux or in windows like windows xp, windows 7 and windows 8 are method.
- Open Virtual box already installed on your PC or laptop and then click the new button to create a new virtual Android x86.
- Then a new window will be seen and click next, fill the name in accordance with your current in the box provided, switch to the Linux operating system and switch to linux 2.6 version can be seen for example in the image below and click next.
- The new window will be see to set memory capacity that will be used in a virtual box for android x86, if your computer has 1GB of RAM or memory then use the virtual box in 256mb or 512mb.
- Click next for another setting for the virtual hard disk, Create new hard disk and select the VDI and then select Fixed size and click next.
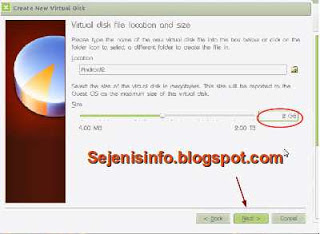
- Click next to set capacity to use, I use only 2GB.
- Click next and click create and wait until bar process is to create a virtual hard disk finish as in the example picture below.
- Next click on the settings button to the storage arrangements to enter iso file into a virtual box that you created.
Because the steps are still long and I was a bit sleepy to continue this post, more can be seen on the video below for how to install android 4.3 x86 jellybean on virtualbox.
Description: Android x86 jelly bean 4.3 install in virtual box on windows os
Rating: 4.5
Reviewer: Tes
ItemReviewed: Android x86 jelly bean 4.3 install in virtual box on windows os
 |


followed the steps but always getting Error
ReplyDelete"Kernel Panic - not syncing Attempt to kill the idle task
restarting in 60 seconds
"
while installing
are you using The latest release virtualbox is version 4.2.18. ?
DeleteWhat android x86 iso ?
Create disk with "Dynamically allocated" and format to ext32 setting Operating system "Linux" and version "linux 2.3"
gan... ane knp sampai detecting android-x86 aja ya... abis itu titik titik titik ....
ReplyDeleteCoba lihat cara nya yg di blog saya satunya lagi.. http://sejenisinfo.blogspot.com/2013/08/android-x86-jellybean-43-di-install-di.html
DeleteDi install di virtual box atau langsung ke komputer ? coba buka vlog saya yg satunya lagi di http://sejenisinfo.blogspot.com/2012/12/cara-install-android-di-komputer-pada.html
DeleteHola que tal , me podrias pasar el link del ARM traductor ? gracias desde ya
ReplyDeletei don't understand.. english please
DeleteI've got Android x86 running on Virtual Box except for OpenGL 2.0. Do you know how to get that as well?
ReplyDeletei'm sorry i don't know but you can try here about 3D support
Delete1. https://www.virtualbox.org/manual/ch04.html#guestadd-3d
2. https://groups.google.com/forum/#!topic/android-x86/PdNJen13q7E
3. https://groups.google.com/forum/#!topic/android-x86/qSmQ2qj_ARY
wifi is not workin for me help me bro
ReplyDeleteThe problem is your spesification of your laptop/desktop, you can try this tips in
Deletehttp://code.google.com/p/android-x86/issues/detail?id=808
https://www.youtube.com/watch?v=Mngdn0Be5g4
Thanks
teknofizi,, pasang speedy instan gan,, wifi gratis truz,,,, hehehe ciyus,,
ReplyDeleteOk... thanks
ReplyDeletegan bisa di root pa di kasih aplikasi RootEx ga?
ReplyDeleteyg versi ini tidak bisa di root bisa dilihat diatas bahwa yg ini no support superuser dan untuk root biasanya di installnya harus di partisi fat32 atau ext3 root sudah otomatis darisana jangan di partisi NTFS untuk yg bisa root dan udah secara otomatis bisa dilihat di http://sejenisinfo.blogspot.com/2014/02/cara-install-android-x86-kitkat-di-pc.html
ReplyDeletehttp://sejenisinfo.blogspot.com/2013/05/android-x86-42-jelly-bean-untuk-komputer.html
Nice and informative post dear Zero Clients & Thin Clients
ReplyDelete
ReplyDeleteThanks for sharing Good Information
Android Online Course Bangalore