Friday, May 02, 2014

No sound in tv tuner card windows 7 setting manual solved

On the PCI tv tuner philips saa7130/34 that was i have installed in windows xp and windows 8 no problem, picture and sound goes well, but after I change the operating system with Windows 7 then I get a new problem, image appeared but sound disappear no sound at all, when I look at the line-in playback visualization goes well up and down on a regular basis in accordance with the sound produced.

I had thought that this problem is on the hardware, but I've tried to open and plug move the plugs from the Line In jack to the microphone, but the result remains the same no sound in tv tuner applications in windows 7.

I also replace the driver from the old driver and then I replace it with a new driver corresponding or similar to the tv tuner and I began to install but still the same result, a variety of ways and I get the solution I had not yet found the solution.

And finally I am looking for another way to do manual settings in control panel and playback on the speakers or the sound recording and the results the sound are returned in tv tuner although there is a slight problem with tv tuner application that when I apply this manual setting the mute and volume can not be serves as the manual settings directly related to the setting of the sound master windows, so if I want to down or enlarge the sound I had to do it on the windows speaker volume on right below the taskbar.

Here's how to make sound work on the tv tuner in windows 7 :


1. Right click on the taskbar speaker volume on the right bottom
speaker icon volume windows 7

2. After right click on the mouse in speaker icon on the right bottom taskbar then there will be options and click recording devices.
playback recording devices windows 7

3. Once click on recording devices it will pop up a new window and click on the recording tab and select the appropriate with plugs that you select, for example, you plug jack cable tv tuner to line in and right click and click properties like picture below, but if the cable plugs into mocrophone then right click on mouse and select properties setting on the microphone.
recording sound setting tv tuner windows 7

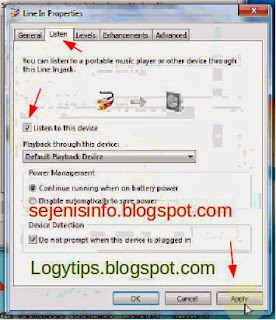
4. You see on picture below Select the Listen tab and check the box the device listens to this and click apply or click the Ok button.

tv tuner sound windows 7

As I have said above that the wearing of this manual way then mute and volume could not work even if we reduce or enlarge the sound will still have no effect unless we operate the speaker volume to up and down the audible sound in windows is in the bottom right of the taskbar.

Update 28/05/2014 :
Or if you have installed your realtek driver software you can volume up in volume setting  see pictures below :

1.Right click on mouse to speaker realtek icon and select sound manager

2. After you click sound manager and you will see this sound setting, go to your cable tv tuner plug in mic or line in, in this picture below i use line in to plug in cable and see volume up the playback.

Blogger Tricks

Wednesday, April 02, 2014

How to share internet from android to laptop via wifi without software

It seems like this post is long tips on tips and know this because this how to share internet connection from android connection to a laptop via wifi, but this blog is too long didn't update.

For now use a smartphone and a laptop was now widespread and have become daily consumer goods like eating every day because the people without a smartphone these days maybe they're upset, and now the internet is the everyday needs as well, then if we were less satisfied using browsers on Smartphones such as the android browser smartphone but less satisfying because of the size that is too small, so if you have a laptop with wifi is available then we can share the internet connection from android to a laptop or PC that has wifi connection.

Previously I've been posting about how to share internet connection from android phone to laptop/pc by using the USB cable.

With Wifi can be easily used, we can share the Internet or share files or folders of data from one device to another device without the need for cable, because before wireless wifi existing like the transfer of the data files or folders and internet sharing can only be done through LAN cable.

Using the cable will be a little untidy in the room look around, especially if there are very small in a room and multiple PCs connected to the cable looks very untidy if the person who set up the cable layout is messy, and sometimes we would stumble by cable located under the floor.

Currently there are many who use the wired LAN and it is not a little, but it is appropriate for large companies to replace wired cable networks with wireless Wifi networks because it will be more profitable and more look good.

How to share internet connection from android phone to laptop/PC via wifi :


1. Make sure HH (Handheld) android already connected to the internet
2. From the android phone go to settings, can follow this way below,
Setting --> More --> Tethering & portable hotspot --> Set up Wi-Fi hotspot -->
- Network SSID fill with a wifi hotspot name up to you.
- Security set to WPA2 PSK
- Password filled up but there must be 8 characters can be letters or numbers or collaboration
- Save
Or see the image below:
  • Following this image screenshot from my tablet, click settings and see image below
    setting android wifi portable
  • Click on Tethering & portable hotspot
    setting portable wifi android
  • Fill with your username and password and save
    fill username password wifi android
  • Checklist to active wifi hotspot
    checklist to hotspot active android wifi
3. After filling wifi hotspot name and password press back or return to the previous menu and press or checklist at the Portable Wi-Fi hotspot, the WiFi hotspot is already running android.

4. Now onto the laptop, set that on the laptop to a wifi network is already enabled, can be viewed on the existing laptop taskbar at the bottom left there is a picture such as a monitor or as an image signal, click and scan for wifi android wifi if your name has been detected,  connect by clicking on the connect button and enter the password that has been created in android earlier. In the picture below is the view laptop wear wifi connection windows 8, windows 7 the same way as are the windows xp I think.
  • click on the image signal as shown in the picture below
  • laptop connect wifi
  • In the picture below with android wifi connection already connected
    wifi android to pc
5. Open the browser on the laptop and try to test open google for example if it is connected it can open google.

6. completed

Wifi is a tool that can replace the current LAN cables, in addition to more efficient because it will look better, Wifi laptop with android would be better to also be used to copy and paste files or folders will be lighter and does not need to be complicated with a cable that looks annoying.

To connect the android phone to other android phone can we use and with steps above the different only a little active hotspot on android phone and turn wifi on other android phone and then scans wifi around after that you might as well know :).

For that on a laptop or PC / computer no wifi then can use the usb cable to see how here.

Friday, March 07, 2014

Install android kitkat x86 in virtualbox windows or linux ubuntu

After I made a post about how to install a dual boot android kitkat x86 and windows  if there is still the possibility of confusion between choosing a partition or grub settings to boot android entry or, for that I give one other alternative to install android x86 kitkat with virtualbox, I think install android PC / laptop with a virtual box more better because it's easier and does not create a new partition on the hard drive.

By install android kitkat x86 in virtualbox can be done in windows operating system like windows xp, windows 7 and windows 8 as well as linux ubuntu as long as the operating system already installed virtualbox.

The tips below I did install it on Linux ubuntu virtualbox for virtualbox in windows but also I think the same way as below.

And for those want to directly install a dual boot android x86 kitkat with windows or ubuntu can see here.

For using ubuntu after install android on it then can be added grub android setting open the terminal typing "sudo gedit /boot/grub/grub.cfg" without quotes and place it at the very bottom.

Android kitkat latest version of the android operating system with new features and we can use on virtualbox, with virtualbox the installation and use easier way, even if the internet will be directly connected to the internet if internet PC is connected, for that I suggest instead we install android on virtualbox is better  than dual boot, with virtualbox android kitkat then can we enlarge the view of the virtualbox, view by clicking the tabs at the top left virtulabox and click full screen.

Here's how to install android x86 kitkat in virtualbox windows or linux ubuntu :


1. Download virtualbox here or here, after the download and install on your PC / laptop.

2. Download Android 4.4 x86 kitkat here.

3. Open virtualbox and then click the New button on the left above under the menu file. All pictures in here is from my second blog.
android kitkat in virtualbox

4. Once clicked a new window will appear and click next, then fill the name in accordance with you want of its name is Android for example see the image below
setting android kitkat in virtualbox

5. Then click next after a new window will come out and determine the capacity for memory or RAM on your PC or laptop if it has 1GB ram I suggest to fill it with 128/256mb and if 2gb I suggest to fill it with 256/512mb.
ram virtualbox android kitkat 4.4

6. Next and new menu will appear to create a new virtual disk, select create new disk and click next.
  • make virtual harddrive virtualbox
  • Chooce VDI (Virtualbox Disk Image)
    virtualbox hardisk VDI

  • Chooce Dynamically allocated
  • Once finished creating the virtual disk and then click next and fill the hard drive capacity will be created, i suggest you to create 2GB.
  • After the contents of the virtual disk fill with capacity then click the next button and then click the create button and the process bar will look like in the picture below if appear

7. See file machine android in the left as shown below.
8. To install android click settings button as shown in picture No. 7 and a new window will appear then select the storage, see the arrow and click a button to open a file choose disk where the android x86 ISO kitkat stored and select the file.
memilih file iso android kitkat di virtualbox

9. After the ide Controller filled with the android x86 kitkat iso file that was downloaded click the Ok button at the bottom, and click the start button.

The steps is still long so I recommend to look directly at the video below


Video above shows how to install android x86 in virtualbox kitkat so with the video would be easier we will do the installation. So every step will be obvious and may be less than the error read on :), as you may well know the use of language and grammar or spelling looks a mess.

Friday, February 21, 2014

How to dual boot Install android kitkat x86 and windows on pc or laptop

Been a long time I did not make a post because too lazy to make new posts, but already there are some tips or turorial is to be made.

This time is not much different from the last post, namely how to install android on a PC or laptop with android x86 kitkat.

Already three posts related to how to install android on a PC or laptop that can be installed directly to the partition or to the emulator by using virtualbox, and can be used or a dual boot with windows xp, windows 7 and windows 8 even with linux like ubuntu etc..

Android kitkat is the latest android version with some significant changes, the display is a bit similar to the jellybean but new features from this kitkat android maybe you can see and feel after you install.

This kitkat Android emulator version that can be installed directly on a PC and can dual boot and can also be installed in virtualbox, but the functions and features nothing has changed with the android version kitkat on Handheld. But the differences features are usually can be see from display a Custom ROM you used.

Are you the one that's already tried this android kitkat, if it not possible to try and follow these steps below, or you have own steps to install this android x86 kitkat on your PC/Laptop.

And if you want install android kitkat x86 in virtualbox you can see here

There are two way to install android x86 4.4 RC1 kitkat as follows:

A. Install android 4.4 x86 kitkat using grub from android itself but this is not recommended, because if something goes wrong like boot windows erased or overwritten by grub boot boot into windows will result in an error.


In this step A your MBR disk setting will be replace with grub from android so i suggest to think before use this step A, see in step B below.

1 . Create a new partition in the windows 2GB , and format it to FAT32 type partitions can be put together at the windows but it is good in separation because if there is an error then the windows will not be disturbed . For more details can be seen in the video below this post .
2 . Download android - x86 - 4.4 - RC1.iso looking at android - x86.org
3 . - Burn into the USB flashDisk with Unetbootin , but be careful when going to burn it to flashdisk the datacan be erased .
- Burn to cd use nero or other iso tools .
4 . Restart the PC and then boot to USB flashdisk or cd android 4.4 kitkat by way of plug usb stick into the PC and restart the PC and then enter to bios and change the first boot to USB or CD if that use CD or if you know can directly click the button boot like F9 , F10 , F11 or F12 in accordance with the settings of the PC bios .
5 . After entry into the x86 android 4.4 kitkat first select the third option is a Live CD - Debug Mode to find out where is the fat32 sda partition, after entering typed fdisk -l and its results will be there as shown below :

android debug mode

In the picture above because I made a partition on the hard drive is FAT32 only one there for android so mean here the partition for android is / dev/sda3, so later on when install android install to sda3.
6. Restart the PC and boot back into android and select the fourth ie Installation - Install Android-x86 to harddisk.
install android in laptop or pc

7. It's already been known that the partition is sda3 for android, so install android on sda3 and do not format, to keep from mistakes of formatted
android kitkat on laptop

8. In other next option do not format the partition to another type and chooce OK and enter.

9. Install grub select yes and enter.
10. Select yes to boot to windows through grub. 
install android kitkat di laptop
11. Once we enter the android will soon be installed, and then to determine the memory capacity for android, we can give a maximum of 2048.
finish instal android kitkat 4.4
12. After install is complete, restart the PC and unplug the flash drive or cd in cpu, and the image below is an example for a grub boot android and windows.
choice boot android x86 dan windows

B. Install android 4.4 x86 kitkat grub2win using:

1. Follow the above steps of No. 1 to step no.8, then for grub option do not install just skip for grub install.
install android with grub2
2. Then if there is an option as shown below select OK and enter.
3. Then Select Yes to save the data.img on hard drive, the maximum memory size is 2GB or 2048 MB.
4. When finished reboot or restart the computer and run into the windows.
5. Grub2 for windows download here. Extract grub2 for windows on drive C:/grub2.
6. Go to the folder and install grub2 in grub2 folder namely is grub2win.exe after installed grub.cfg will there, open grub.cfg with notepad and add the android boot menu at the bottom of the texts. below is boot android text.
 ###Android KitKat###

menuentry "Android KitKat" {
set root='(hd0,X)'
linux /android-4.4-RC1/kernel quiet root=/dev/ram0  androidboot.hardware=android_x86 video=-16 SRC=/android-4.4-RC1
initrd /android-4.4-RC1/initrd.img
}


menuentry "Android KitKat (Debug Mode)" {
set root='(hd0,X)'
linux /android-4.4-RC1/kernel quiet root=/dev/ram0  androidboot.hardware=android_x86 video=-16 SRC=/android-4.4-RC1 DEBUG=1
initrd /android-4.4-RC1/initrd.img
}


### End Android ###


Replace the red text with a partition installed android for example the android installed in sda3 then replace hd0,X above with hd0,3 save a notepad and restart the PC or computer and after turn on the computer there will be two options first boot windows and the second is gRUB 2 Windows option and select the grub 2 android windows to get into android.

Install android x86 Kitkat dual boot with windows 7 video.

If there is a mistake in this article or have any questions please comment in the comment box below this post.

Thursday, November 07, 2013

Forgot my samsung phone pattern unlock code

Recently I helped my sister who has a problem with unlock pattern android phone samsung galaxy GT young, but all the android phone applications installed on the Android phone erased, because before I didn't know it turns out there are other step that can to open forgot unlock pattern.

My suggestion is that we are equipped with the android phone pattern or password to enter when the application phone menu then you should not get use by others who do not know the unlock pattern or password that we set, so if the number of times wrong and usually three times to unlock of the patterns will be entered into the log menu to enter user name using our email account and password.

But if the email or password is forgotten that we use as user and password on our android phone and will become confused, but we can indeed use the place of phone service but if the places is far from home and the money must be come out it would make us so lazy.

2 steps How to unlock pattern unlock a forgotten password:

The first step is probably going a bit difficult for those who have never used adb command but it will be better because of the settings and applications that have been installed will be safe.

1. By using ADB, this step from www.putrifauziah.com with this step then it seems that there are applications in android phone that has been installed are not deleted.

  • ADB is Android Debug Bridge, which means a bridge to connect the computer to android or android to android so we can install Android applications on the computer.
  • Download ADB application at adbdriver.com and how to install adb to be seen in theandroidsoul.com.
  • After ADB can be used on the computer and then do as follows below:
        - Open CMD in windows and typing "adb devices" (without the quotes) (if the driver is installed, android phone will detected)

        - Typing "adb shell" (without the quotes)

        - In linux Typing "rm /data/system/gesture.key" (without the quotes)
forgot unlock pattern samsung phone
After it shut down and restart the android phone if successful it will be straight to the phone menu without unlock pattern.

2. By reset to its default settings or settings restored to its original settings, this step from science-android.blogspot.com but the data and apps is already installed will be deleted.
  • Turn off samsung android young phone.
  • Press the Volume UP + Home button + Power button simultaneously until the press came out and release the samsung logo to boot into recovery.
  • Then press the volume up (+) to shift and volume down (-) to start running the command press the home button or the power button.
  • Select the "wipe default factory reset"
  • Reboot or turn off and turn on the samsung android phone unlock pattern will disappear and go to the start menu.
samsung young unlock pattern

Of the two steps above its select one if possible but if the firts step not help choose the one step, forgot unlock pattern and password may be done well and can be re-used android phone.
If any of the above tips can not use the second step, But for the second step as I've said above you have to give up all the applications and settings that have been saved will be lost, but of the android phone becomes unusable better steps to use it. Because every setting and all the applications that have been installed will be able to install and set us back.

  • Visitors