Monday, September 09, 2013

How to repair bad sectors on a hard drive with non physical damage

Bad Sector on HDD ( hard drive ) is often times occurs on a computer or laptop that we use everyday , could be due to physical bad sectors or software bad sectors the two likely is bound to happen on the hdd ( hard drive ) is too much to run activities or many run heavy applications. Bad sectors on the hard drive is physically the most likely can no longer be repaired , but the data can still be saved in a service place or serve rescue the data on the hdd ( hard drive ) that is damaged .

At the HDD ( hard drive ) that is not in bad physical sector is only on the software or similar I also do not know too much about it , but I 've tried on several multiple hdd ( hard drive ) and some are bad sectors can be recovered and partly can not be repaired anymore .

If the hard drive is starting to give a fairly loud noise sometimes even then still can be fixed , but sometimes not long back become bad sectors usually windows will often hang / lag and will only get worse until it can not be used again . Therefore if the hdd ( hard drive ) has come out very loud sound immediately backup all existing data to your second hard disk.

Some causes of disk bad sector affected computers restart repeatedly or frequent power outages due to strong not hold a lot of power, so the harddisk experiencing frequent crashes and hangs , and the hard drive has bad sectors affected then by the time we are running an application and often jammed or lag and hangs up the application could not run again and must be restart and re -run windows .

How to check whether the hard drive bad sector affected or not , we can check with Minitool partition wizard, a windows software that we can use to create , cut , wipe and check the hard drive from bad sectors. The minitool partition wizard can be use on windows xp, windows 7 and windows 8.

This how to check bad sector on hard drive


1 . Download and install the application Minitool partition wizard here .

2 . Once downloaded and installed we can directly use .

3 . Open Minitool partition wizard and check the hard disk with right click on mouse and choose "Surface Test" text and click the left mouse , then after the new window appears please click on the start button is on the top right.

4 . Scans will run , if the color of the small box is the green the sector or block is safe or good , and if the little box that have been passed is red then it is bad news because it is the sector / block that is damaged or bad sectors , should be immediately fixed by other software if the bad sector can be repaired with hard drive recovery software.

The first method to fix repair / recover bad sectors on a hard drive is to use software HDAT :


1 . Download HDAT software here . can be used for computers , laptops and netbooks .

2 . Once downloaded extract it to a folder and burn on CD/DVD blank using applications for example ISO buster, isomaster or Nero. In addition, if you have a HBCD CD / DVD use it there are lot of software for hard drive data recovery software and more.

3 . In this example I use HDAT is in HBCD  please search in google by typing HBCD ISO file to download it .

repair a damaged hard drive with hdat

4 . Once selected hard disk to be repaired enter on the keyboard and select the first part of "Drive Level Tests Menu ".
drive repair menu hdat

5 . Then choose the first part also the " Read and Repair bad sectors " that will be running disk repair process soon .
read and repair bad sectors

6 . Wait for the scan and repair process hdd up to 100 %, the scan process is blue color and if not found a bad sector on the hard drive the line will be all blue, but if the line are red with B letter that has been is bad sectors and if hdat able to fix the bad sectors and after re-scan the bad sector will be gone , which means bad sectors already fixed and there is no more damaged sectors .
repair hdd bad sector scan laptop computer


The second method to fix a damaged hard drive / bad sectors by using HDD Regenerator :


1 . Download HDD Regenerator here for a version of Windows

2 . Once downloaded and installed then run hdd regenerator and select the hard drive to scan and recovery bad sector.

hdd regenerator bad sector repair

3 . In above picture i use hdd regenerator from HBCD, after being selected to the correct hdd then select the first part of the number 1 of choice is scan and repair.
scan the hard drive repair damaged

4 . To begin the scan and repair hard drives ranging from 0 ( zero ) then click enter directly from the keyboard and if you want to start from the middle or a specific part then typing the numbers of which we will scan for example ranging from 1gb then typing 1024mb and enter.
scan and bad sector found on your harddrive

5 . From the picture above on No. 4 that is currently running hdd regenerator to repair the damaged block or sector , if the box is white after the scan is complete all that is 100 % then the hard drive does not have problems and if the rectangular box is have the "B" letter and "R" sign that the hard drive already fixed.

There is a big possibility if the hard drive has been severely damaged in the destruction of the physical damage, although there has been contained the letter " R " or a sign that the hdd has been successfully repaired and after we restart the computer in question and recheck with the hdd regenerator and if there are still have bad sector so the hard drive can not be fixed, Try using low level format tools,  and there are many software to fix a damaged hard disk in a different method.

Hopefully can help and hopefully successfully to recovery your bad sector on hard drive.

Friday, September 06, 2013

Android x86 jelly bean 4.3 install in virtual box on windows os

For those who always want the latest update ie android x86 here the android 4.3 jellybean x86  has been released and can be used after the previous android 4.2.2 x86 jellybean have to posted a few months ago and although android 4.4 kitkat released but android x86 no news yet about it.

With ​​there are some changes that have been updated and most of this time has been updated too with the support arm translator, which means we can run almost all android apps in google play store,  different with android previous ones is android x86 jellybean 4.2 that not support.

Before we try to install directly to the hard drive perhaps we could try to install android x86 in virtualbox so that we will know what the pros and cons of this android jellybean 4.3 x86. And if it is as expected and works well as the android phones are used. That way we can evaluate for themselves of the advantages and disadvantages of android x86 that we will install, because maybe there will be people who want to dual boot between android and windows that are installed together on PC/Laptop.

And here are some things that have been updated and corrected from the Android x86 source:


- Support ARM translator
- Support bluetooth
- Upgrade 3.10.2 kernel so that it becomes more driver support
- Upgrade Mesa OpenGL ES library to 9.2 devel for support amd radeon acceleration  and intel chipset.
- Also Not able to suspend and resume
- No support superuser.

There are several ways to install android version of this computer or android x86  jellybean 4.3, and I give it two ways.

1. How to install x86 android 4.3 jelly bean on a PC, or laptop computer can see linked below

dual boot android and windows.
The first way above could be see on steps in the link above and the grub setting install grub2win for android-x86 you can see the method in link dual boot android and windows above and add android x86 jellybean 4.3 grub manually below:

# android #
menuentry "Android-4.3-test"{
set root='(hd0,X)'
linux /android-4.3-test/kernel quiet root=/dev/ram0 androidboot.hardware=android_x86 video=-16 SRC=/android-4.3-test
initrd /android-4.3-test/initrd.img
}
### End Android ###

note: change the red text with  partition installed on android from your computer example if android on partition or drive D: then replace with (hd0,2) sometimes Drive D: = (hd0,3).

2. The second way to install android-x86 is in a virtual box

Also this steps can be use on Linux ubuntu virtualbox.
  • Download virtualbox windows version if it will install a virtual box in windows here because there are several other options such as Linux and MAC OS X.
  • Download jellybean X86 Android 4.3 iso android-x86-4.3-20130725.iso code@google or Android X86 .org 
  • After downloading the next step is to install virtual box on computer and start preparations to install android in virtual box.
  • Virtualbox installation on ubuntu linux or in windows like windows xp, windows 7 and windows 8 are method.
  • Open Virtual box  already installed on your PC or laptop and then click the new button to create a new virtual Android x86.
  •  
This images from my second blog.
android -x86 4.3 jellybean virtualbox

  • Then a new window will be seen and click next, fill the name in accordance with your current in the box provided, switch to the Linux operating system and switch to linux 2.6 version can be seen for example in the image below and click next.
android-x86 setting on virtualbox

  • The new window will be see to set memory capacity that will be used in a virtual box for android x86, if your computer has 1GB of RAM or memory then use the virtual box in 256mb or 512mb.
setting memory ram on virtualbox

  • Click next for another setting for the virtual hard disk, Create new hard disk and select the VDI and then select Fixed size and click next.
create new hardisk on virtualbox
vdi virtualbox
fixed harddrive virtualbox

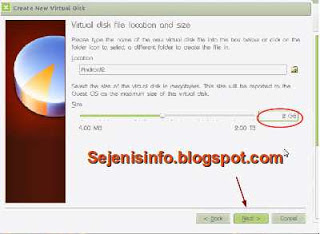
  • Click next to set capacity to use, I use only 2GB.
hardisk partition for android x86 on virtualbox

  • Click next and click create and wait until bar process is to create a virtual hard disk finish as in the example picture below.
creating harddrive virtualbox
android x86 on virtualbox ready to install

  • Next click on the settings button to the storage arrangements to enter iso file into a virtual box that you created.

Because the steps are still long and I was a bit sleepy to continue this post, more can be seen on the video below for how to install android 4.3 x86 jellybean on virtualbox.

Tuesday, September 03, 2013

Failed to start or load libgl.so in ubuntu android sdk emulator

When I install android sdk emulator on a computer with the operating system ubuntu 12.04 and run and when i run android sdk emulator i have error message are failed to open or load libgl.so and shared , first I had thought that this was one of the low of the specifications of the computer that I use , but after I did a search on google and finally I got a solution that actually provide a solution .

I got this info from the learned stuf with title blog in the post is fixing ubuntu error : Failed to load libgl.so , that's the title of the post , and I would also like to thank you for having the blog :) .

I'm forget how to solve failed to load libgl.so on android sdk emulator in ubuntu is just to install libgl1 mesa , as shown below :
Open a terminal and run or install the following :
sudo apt-get install libgl1-mesa-dev

After i try and run the android sdk emulator in ubuntu , failed to load libgl.so hope is gone and is ready for use as well as the android sdk emulator that I use my computer at home.

Here the early solution from teh other with add the following command on terminal ubuntu than that by linking from another file like this :
ln - s / usr/lib/libGL.so.1 ~ / android-sdk-linux_x86/tools/lib/libGL.so 
After I try into it in The first load load successful but after I restart the computer and then run back android sdk emulator still error message again appears failed to load libgl.so. And in the end I just give up and use with failed to load libgl.so and shared libgl.so on android emulator but seems to be a little slower and lag and I used to be uncomfortable .

Once again I said many thanks to Learned stuff  for giving the best solution for me :) . Why do I talk too much because i need writing around 300 words in the word count office :) . And finally had fewer than 300 words :) . Good luck

Monday, September 02, 2013

Free 11 health apps for android phones

Health is one very important thing and it's expensive for those of us who have busy schedules with work and no time to exercise. Perhaps one of the most important things to check any of our health such as blood sugar , heart and so on.

We'll talk about android , open source this one apart is a wide variety of types , brands and prices varied also equipped with an application that is very important for us , in addition to essential to everyday life is also important to help a variety of our work .

Not much to say anymore I just go ahead and give you a review of important applications for health in android which can be downloaded for free but some are paid .

Free 11 Android apps for health :


1 . S Health samsung apps , tools or applications for android samsung galaxy s4 health this function to check whether you are healthy before but this tool should be connected to other medical devices which connect to the android with usb.

2 . Daily Yoga (All in one), health apps for android this one is to provide yoga exercises at home quickly and in this application you can follow the movements of yoga are given as examples on the pictures and in texts .
daily yoga android apps
3 . Nike + Running , a health application that provides motivation to exercise, especially when we are jogging so when we ran and we open the application in the given direction on GPS to provide these routes around the road that must pass our place.
4 . Health - Daily Info , android application give information will be more understandable for us in which there are a variety of tips and info about health that we can follow such as , daily healthy tips.
health apps android phones

5 . Medicine + Drug Dictionary , health care application android are applications that we can know the various medicine and drug from that apps.

6 . iTriage Health , from the name already we can know that this android app is an application about health in providing information, help you about answer the questions about health, medicine, dosage and more.

7 . Ask a Doctor , android provide services to each user to consult with a doctor wherever you are and whenever you want does so because I have not tried to read and read just recently wrote :) . We can consult with our convenient home or anywhere for free .

8 . Healthy Recipes , provide information about healthy recipes you can get every recipes and help us to health.

9 . First Aid kits , medical applications for android this is the English-language application that serves to give first aid when you crash before you are given other treatments .

10 . Calorie Counter , other English-language applications that we can download and use for free that gives info about the calories contained in fruits , vegetables and other foods . Can be used without Internet or offline .

11 . Virtual Gym Fitness Home & Gym , if you are at home and want to exercise or sports fitness can now be done easily with this android app , comes with 3d drawing practice tips in fitness & gym.

With a lot of android applications for health available in play store and can be installed free of the health of our control and we can update to keep you healthy and better life.

Health care is expensive but sick its price will be more expensive costs, so what would we choose? but as for the sound of some perception that health is cheap but it will be costly if the sick is the price paid by us, which is it? I think both of them really depends on us how to maintain health is like.

Tuesday, August 20, 2013

How to install android sdk on windows

Due to a problem when installing or using BlueStacks android with a low computer specs as only 1 GB Ram and VGA are not HD or VGA is still minimum around 256 MB or less it for use during install BlueStacks on Windows will run into various problems such as VGA which should be updated and at the time of install some applications like WeChat that can not be installed in BlueStacks is being installed on a computer with low specs.

If the user experience of these things were supposed to VGA with a capacity of 128mb to 256mb should be updated VGA driver or update it with a VGA which has a capacity of at least a decent enough example of 512mb, but if so we could use alternative android emulator such as using android sdk and can be installed in various windows like windows xp, windows 7 and windows 8, android sdk installed in ubuntu was running well.

Android sdk emulator is that we can use on your computer or laptop so if we do not have a android phone and just want to know how the operating system works, and it allows us to use a variety of applications in the android emulator on PC such as WeChat, WhatsApp, KakaoTalk , line, games and so forth.

I use the android sdk emulator in Windows 8 with a dual core Pentium PC, VGA 256 mb, 1 gb ram initially but android sdk liked it a little tough but after the upgrade it so 2 gb ram android sdk on my computer was so smoothly although there is little sometimes a little slow.

The following steps should be done before installing the android sdk emulator on a PC, laptop or computer.


1. For those that do not have java on his computer first download and install the java here.

2. Download Android SDK emulator here, select the bottom of the SDK is to post only tool and then select the Windows 32 & 64-bit -> installer_r22.0.1-windows.exe.

3. Once Java is installed and the android sdk tools have downloaded android sdk install it and follow the steps it according to the instructions given, but at the moment there are options such as install just for me and install it for anyone that's up to you but I choose the install for anyone look at the picture below.
android sdk emulator installing

4.After android sdk tools already installed, its folder in program files/android, android so be easy to find or on the run will then open the Program Files folder -> android -> android-sdk and there will be a file called SDK Manager, right click on the mouse and Send to a desktop, this is to add a shortcut icon to your desktop.

5. Open SDK Manager icon on desktop and later there will be option to choose android which will be installed and will be used as an android, there is android 2.1, 2.3 (ginger breed), 3.0 (Honeycomb), 4.0 (ICS), 4.2 (Jellybean). Want all the install also does not matter as long as a lot of Internet quota :).
android sdk avd manager

6. Once downloaded and installed android, then open the tool and click on the Manage AVDS tab at the top the android sdk to start using android emulator.
android sdk avd setting tool

7. Then click the New button on the right android avd tool.
android setting avd tool

8. Fill as needed as described below:
android emulator on windows

  • AVD name = fill free, but don't use space
  • Device is to choose the android that we will use later with a screen size of Android
  • Target is installed in the android sdk tool.
  • CPU / ABI = usually wear arm
  • keyboard and tick skin only
  • Front camera and back camera may be used to select one of the main course options or choose not to use none.
  • Memory Options for the Ram = 1 GB ram computer use Ram = 512 and for use 2GB Ram ram = 1024.
  • Internal Storage 200 free = example only.
  • SD Card = 1024
  • Last click OK.

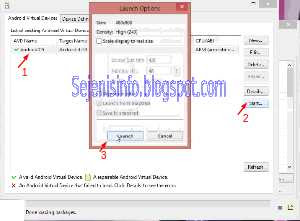
9. After all filled and click OK then in AVD or Android Virtual Device Manager will be the name of the android system we have created. To do this we can directly click start on the right, to make a new android emulator and click New to Change we can click on the Edit button. To start using the Android SDK on Windows click on the name of android that had been made ​​and start clicking on the right and click on launch window.

start android on windows

10. Then a new window will pop up was the android sdk. To make the android sdk so that its display to portrait or landscape or rotate or rotated into elongated click the button number 7 or 9 on the right keyboard and of the numlock.

android on windows has been launch


  • Visitors